Wednesday, November 23, 2005
Experienced Christmas tree decorator Sherrie Nichols' philosophy can be easily understood. "I take my cues from nature. Our definition of perfect is different from God's definition of perfect," she told me as we talked about the process. "If you drew a line down my body, my right side is not like my left side, but that's OK because that's me—you don't have to be symmetrical." Here's Nichols' advice for picking the right tree and decorating it just the way you and your family want it.
Measure Your Space
Allow room for the topper so that it won't rub the ceiling. A lot has to do with what your pocketbook can afford. Most of the time you want the tree to be as tall as four-fifths of your wall. A 7-foot tree is most popular for 10-foot ceilings. And a pre-lit tree is the way to go, if you value your time.
Decide on a Theme
So many people have all their keepsakes they put on the tree every year. Sometimes, though, the wife wants a beautiful tree, too, so they end up having two. The keepsake tree usually goes in the keeping room, the family room, den or kitchen. The themed tree stands in the living room or the foyer, places guests come through. This tree usually fits in color-wise with that part of the house or it might be a traditional red, white and green.
Step by Step
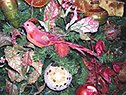
In shaping a tree right out of the box, I tell people to pretend the little branches on the big ones are like propellers on airplanes. You should spread them out into a full but natural look, not all at a 90-degree angle, some at 45-degrees. If you're going for a theme, traditional red, green and white, have at least six of each color. Don't put one of something on the tree—it will get lost. Ribbon helps fill up a tree. On a 7 -ft. tree, I usually start with 10-12 bows—each made with three to four different ribbons—and space them evenly throughout the tree. Put three of the bows at the top where they'll be underneath the topper, making a frame for it, giving it a base. Then come back with one of the ribbons from the bows, a 10-yard bolt, and weave it through the tree. Start at the top and go to the left, going around the tree, and coming back to the right to the side where you started. As you're going, you'll be coming down and working your way back up the tree. On paper it looks like a figure 8, but you've got a tree inside that figure 8. Now you start with the largest things to hang on the tree, whether that's flowers or ornaments. If you have a collection of, (for instance) eight large items, spread them throughout the tree. If you've got long, hanging items, make sure to leave space for them to hang. Here's a secret tip: When you put an ornament on the tree, hook it on the branch tight, snug. The topper comes last. I like to put something unexpected. Whatever it is, you need to secure it well. Ting Ting—a brand of glitter branches—underneath the topper make it glow and help frame it. Of course, it's always a good idea to look at the trees on display at places like Callaway's.
Store It For Next Year
It's not a good idea to put an artificial tree back in the box if you want to extend the life of the tree. Most quality trees come in three sections. I suggest you take the tree apart—after you've removed the decorations, wrapping each one individually so that they won't break, and stored them in boxes. Don't mash your bows—use wired ribbon so that you can re-shape them each year. Put each section of the tree in a large trash bag or one of those zippered tree bags and hang them upside down in a closet. Heat makes the trees and the light wires brittle. Attics take away from the life of the tree.
Comments
Use the comment form below to begin a discussion about this content.
Sign in to comment
Or login with:
OpenID